|
|
|
|
|
|
|
|
|
|
|
|
|
|
|
|
|
|
|
|
|
|
|
|
|
|
|
|
|
|
|
|
|
|
|
|
|
|
|
|
|
|
|
|
My '88 Bronco 2 Build-Up Page 2
|
|
|
|
|
|
|
|
|
|
|
|
|
|
|
|
|
|
|
|
|
|
|
|
|
|
|
|
|
|
|
|
|
|
|
|
|
|
|
|
|
|
|
|
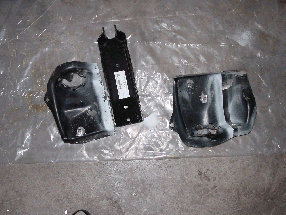
...then marked a line at the beginning of the shock tower portion. I cut the shock tower off using a sawzall. It was very easy to do with the bucket off of the frame (I have in the past cut the shock tower section off without removing the whole assembly first, and it is a PITA).
|
|
|
|
|
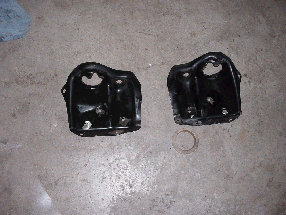
I was looking for buckets off of a full-size, but had a hard time finding anything really appropriate. We don't have any real Pick and Pulls in the area, and none of the local yards seemed real interested in helping me out. So I planned to make the original coil buckets work for now. First I took them off of the frame....
|
|
|
|
|
|
|
|
|
|
|
|
|
|
|
|
|
|
|
|
|
|
|
|
|
|
|
|
|
|
|
|
|
|
|
|
|
|
|
|
|
|
|
|
|
|
|
|
|
|
|
|
|
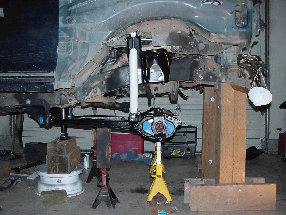
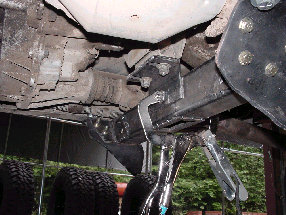
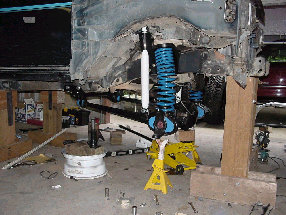
Here is the initial placement of the front suspension, which I will ponder for a bit before I start drilling holes to affix the radius arms drop brackets. I need to devise an effective method of coil retention for the upper bucket.
|
|
|
|
|
|
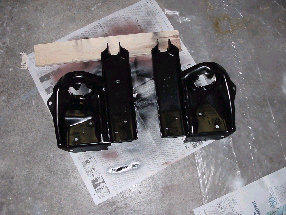
I reinstalled the coil buckets and fitted the F-250 shock towers. I ended up spacing the shock towers out by welding 3/8" plate at the mounting face at the bottom of the tower - this was done to improve clearance under the hood. After tack-welding the coil/shock towers together, I removed the assemblies and welded them together solidly.
|
|
|
|
|
|
|
|
|
|
|
|
|
|
|
|
|
|
|
|
|
|
|
|
|
|
|
|
|
|
|
|
|
|
|
|
|
|
|
|
|
|
|
|
|
|
|
|
|
|
|
|
|
|
|
|
|
|
|
|
|
|
|
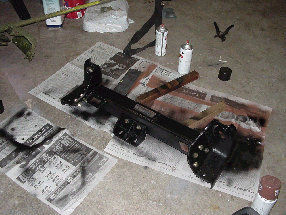
I went ahead and made the tranny crossmember from scratch - I wanted to tie in the drop brackets securely. I used some scrap steel remnants that were given to me a year or so ago when I paid a visit to the steel supplier. If and when I do this again I will use smaller section tubing. As I am no means a fabricator, and this is my first truly fabricated part, it ain't the most elegant thing in the world.
|
|
|
|
|
|
|
|
|
|
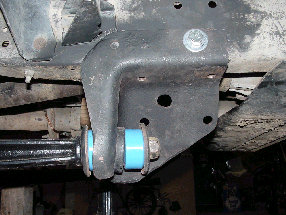
This is a the '78 or '79 big Bronco radius arm drop bracket. Welding a piece of 10 guage steel on top of the bracket, where it meets the bottom of the frame, aligned the back hole with an existing hole in the frame perfectly. This places the wheel base pretty much the same as before, near as I can tell. I did have to hack a bit out of the parking brake cable bracket.
|
|
|
|
|
|
|
|
|
|
|
|
|
|
|
|
|
|
|
|
|
|
|
|
|
|
|
|
|
|
|
|
|
|
|
|
|
It took me a very long evening and then most of the next freaking day to make the thing, mostly because I changed design tactics halfway through. If I were to make it again, I'm sure it would be much faster, and the results would be better. I have the Skyjacker crossmember on my Ranger, and if you can get a hold of one, it might be an easier/better route.
Aside: I'd just about trade my left nut for a bandsaw.
|
|
|
|
|
|
|
|
|
|
|
|
The BaileyFab transmission crossmember uses proprietary Boogerweldz(TM) Metal Fusion Technology and incorporates novel features such as Reduced Ground Clearance and Increased Weight. Every piece is precision cut using our state of the art Angle Grinder and Sawzall.
|
|
|
|
|
|
|
|
|
|
|
|
|
|
|
|
|
|
|
|
|
|
|
|
|
|
|
|
|
|
|
|
|
|
|
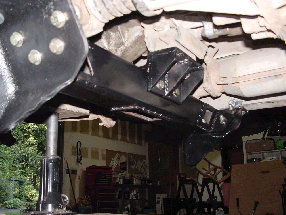
O.K - The majority of the front suspension is now in place. The coils are a little bowed - this may be normal. I should probably adjust the shock tower to better align with the shock travel, but this means taking things apart, busting welds, rewelding...I'll wait as there are no clearance issues.
|
|
|
|
|
|
|
|
|
|
|
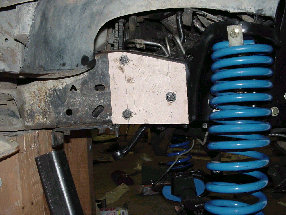
Track bar, Take 1, Step 1: Make a template out of quarter inch plywood as a template for the backing plate. I hate cutting steel with the sawzall and angle grinder, so I made the wood mock-up to reduce the odds of having to cut the plate twice.
|
|
|
|
|
|
|
|
|
|
|
|
|
|
|
Back to Page 1
|
|
|
|
|
|
|
|
|
|
|
|
|
|
|
|
|
|
|
|
|
|
|
|
|
|
On to Page 3...
|
|
|